Fit with ‘Git’
Few years ago, before I got to know about ‘git’, I used to save my projects like version 1, 2, 3, final, final final, final final final.! After some time even I was unable to find the correct version. It was a total mess. And also I was fed up of sharing my code base with others through emails, pen drives, etc. Then I got to know about git. Even though there were so many articles related to git, at the beginning I found it difficult to understand the concept behind the commands that we carried out in git. So I’ll try to explain the concept behind git in a simple way as I got it.
Git is basically a version controlling system, which enables us to maintain proper version controlling. Since git is there to handle the versions for you, you can avoid following scenarios.!
- Keeping a backup whenever working on new feature.
- Trying to do some experiment but if it fails.
- How the hell can others work on same project copy.
By using git, u can avoid above situations.
There are mainly two situations where git initiation is done.
- When You are creating a new project.
- When you are contributing to existing project.
Creating a new Project
When you are creating a project you should initialize git in the project folder.
To do so go to your folder location in cmd (Git Bash or Terminal) and use following command:
git init
Once you enter that command in cmd or terminal, you can see a folder named .git is created. This happens in same folder location you are in. This folder contains all the git configurations related to your project. If you need to create new folder with git configurations where you wish to resides your project use following command.
git init <folder-name>
usually
Now you are all set to use git. Once you start your project within that folder (work-space) which you just created, everything you do in your work-space will be tracked by git. Let’s see how to bring your project to the repository. To understand git clearly, you should know about four major areas in git.

You should follow the above path in order to maintain your git project correctly. Above four areas are not a big deal as it seems. Let’s see one by one.
Work-Space — The file location where your project resides (Where you modify your code)
Stage — Assume you are contributing to a group project and currently you are updating more than one file, suddenly one of your friend asks you to push (will explain later, for now just bringing the code to central repository) your code to central repository. You are done with the file your friend asks, but you have started working on new file which still not completed to push. In a such situation staging area is needed, you can select what are files you need to push. The name ‘stage’ gives its real meaning in git as well. It’s just make the files ready to bring to the next stage.
Local Repository — Local Repository resides on your local machine’s .git configurations folder. Beauty of Local Repository is that you don’t need to wait until you have internet connectivity to push your changes. Local repository controls your all versions as Central Repository does, you can push it to your Central Repository whenever you want.
Central Repository — A cloud space (Version Controlling Service Provider) where you can store and share your project. There are so many version controlling service providers. Such as GitHub, Bitbucket, GitLab, etc.
Let’s get back to commands, when you are going to push your project to the central repository, you should set it on your git configuration first. You can have more than one repositories for each project. Those each and every central repository connections are called remotes. You can add a central repository connection (remote) by following command.
git remote add <remote-name> <central-repository-url>
If you are having more than one repository, use different
As I mentioned earlier, to push your project to the central repository you should follow the above four steps one by one. Each step have a unique command.
To check the files which have been altered, use the following command
git status
It’ll show you the list of files which have been altered in red color. Still we are in the first step, which is Work-Space.
To stage the changes what you are going to push, use the following command.
git add <file-name>
You can add the files one by one using above command. Make sure the
git add — all
As you complete second step which is Stage, now you can bring your changes to the local repository. This process is called ‘Committing’. You can commit your changes by using following commands.
git commit -m “<commit-message>”
You can use any message as
git push <remote-name> <branch>
‘
Branch — If you are not too sure what will happen if you do changes on project or you want to do an experiment on the current project, this is the solution. Branch is a light weight pointer to your commits, default branch is called ‘master’. It initiates as soon as you do a ‘git init’ or ‘git clone’. Branches create a copy (not reproducing the existing project but keeping the lightweight pointer on the snapshot of the current commit) of the current project and gives you a separated work-space, stage and repository. Whatever you commit on your branch it doesn’t affect to your other branches (Ex: Master) and git serves branches as they are independent entities. You can create a branch by using following command.
git branch <branch-name>
When you create a branch using the above command, you will not be moved to your new branch implicitly. If you want to move your branch you have to use the following command.
git checkout <branch-name>
Or you can use the following command to create a branch and move to it. (Instead of using above both commands you can do it at once using following.)
git checkout -b <branch-name>
If your experiment is successful and you wish to merge it to your default branch (Ex: Master), you should move to the default branch using ‘checkout’ and then use the following command.
git merge <branch-name>
In here
Let’s get back to where we paused. Once you ‘push’ to the branch, you are done with bringing your project to the central repository. Then other collaborators of the project can use the changes you made.
Now assume there are others collaborators in your project and they have added new modifications to the central repository. In order to get the latest project from it, use the following command.
git pull <remote-name> <branch-name>
This is the opposite of the push command, and it does two things at once. First it fetch the modified central repository project to your local repository and then merge it to the branch that you are in. If you wish to do them separately. You can use the following commands.
git fetch <remote-name>
This will update your local repository with all the new branches and modifications. Then you can use following command to merge them to the branch that you are in.
git merge <remote-name>/<branch-name>
In some cases you might face some difficulties while ‘pushing’ and ‘pulling’. Let’s see what they are and how to get them solved.
Conflicts
Assume you are doing something on a file. While you are doing that, some other collaborator also do some changes to same file and push it to central repository. When you are going to push your commit to the central repository it gives you an warning saying that you cannot push before pulling.
Now you have no option other than pulling the project by using following command.
git pull <remote-name> <branch-name>
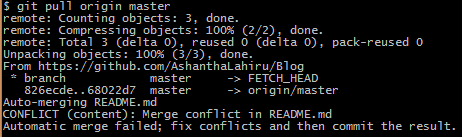
Once you pull the project it will give an output like this on your cmd or terminal.

This happens because more than one people have done changes on the same file and same location. Therefore git have no idea about which one is the correct one and it implies this as a conflict. If you check your local file where conflict occur in my case it’s README.md. You can see something similar to this.
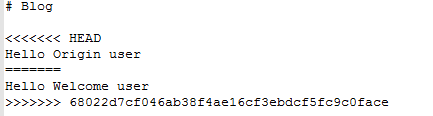
Between the ‘«««< HEAD’ and ‘=======’ shows your local change (Current Change), between ‘=======’ and ‘»»»> 68022d7cf046ab38f4ae16cf3ebdcf5fc9c0face’ shows other person’s modification (Incoming Change). Now you must decide whether both should be there or one should be removed. According to the decision update your code and save it. (Make sure you delete all the symbols which git generates for you, such as ‘«««< HEAD’, ‘=======’ and ‘»»»> 68022d7cf046ab38f4ae16cf3ebdcf5fc9c0face’). You should be able to resolve each and every conflict which occurs using this method. Then you are ready to push your code to the central repository. Since you modified the code ‘git status’ will show you modified files. Just commit them again and push them to the central repository.
When using above method to resolve conflicts you have to do two commits, one is to commit your modification and the other is to resolve the conflict. There is another way to do the same thing by using one commit. To do so you should be aware of Stashing.
Stash
Stashing means something like hiding your uncommitted works from work-space and staging area. It cleans your work-space and bring it to the way it was after last commit. This is very helpful when you need to move to another branch without commit the changes. Because uncommitted changes do not allow you to use ‘checkout’. You can stash by using following command.
git stash
When you are stashing your stashed work will go to a stack (not a usual stack which only can access the last one). You can check the stack log by using following command.
git stash list
If you want to get the stashed changes to the branch you are in, you can just use the following command.
git stash apply
This will bring the latest stashed changes to your current code. (If there are any changes on same stashed and local files it will gives conflict. This will be talk later). If you wish to bring other stashed changes which are located in the middle of the stack, you can use the following command.
git stash apply <stash-name>