Fit with ‘Git’ - Part 2
In the previous post we discussed about the basics of git that we should know in order to do proper version controlling. In this article I am going to brief you little bit about advanced topics in git. Such as reset, revert, rebase and branches.
What you learnt in part 1 is enough to do a project flawlessly. But it is a fact that we cannot do a project perfectly at once. There are always instances where something can go wrong. As an example some changes you do might be a solution for one particular problem but it may causes more problems that you may never thought of. Sometimes you might have done your code in a non-optimal way and you will need to redo that in an optimal manner. As a result of that, we should be aware of how to face such situations.
So let’s get started with reset. But before that you should have an idea about how things works in git pointers.
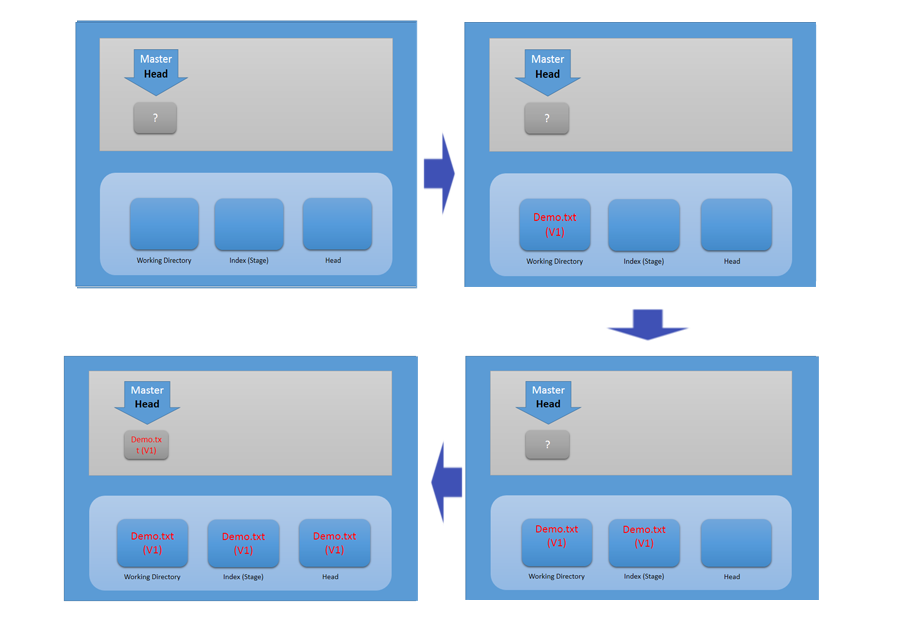
As I have mentioned in part 1, there are mainly 3 parts in local version controlling. Working directory, stage and local repository. These are also called 3 trees (collection of files). Initial commit goes like this,
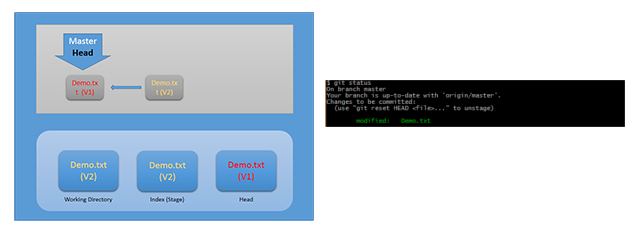
Now you are done with Demo.txt (V1). Let’s modify the Demo.txt (Demo.txt (V2)) and try ‘git status’.
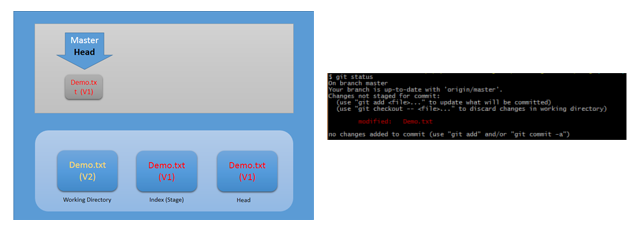
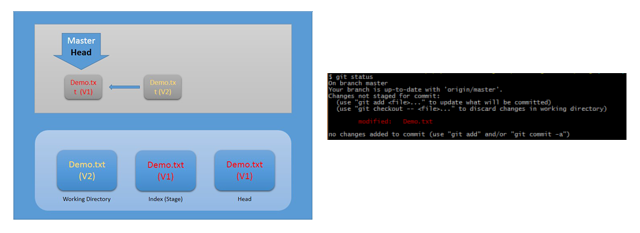
Git status will indicate you by saying that ‘Changes not staged for commit’. This is because, your stage area (index) and working directory are not the same. Then you can stage the changes using ‘git add Demo.txt’ and check ‘git status’.
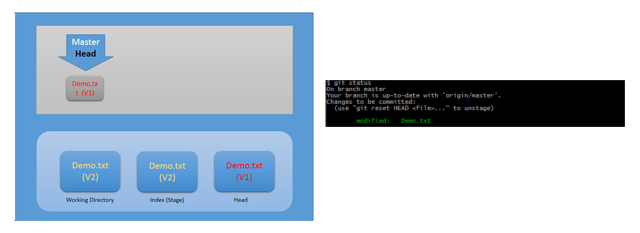
Because your HEAD and stage is different, you will get a message saying ‘changes to be committed’. Use ‘git commit -m
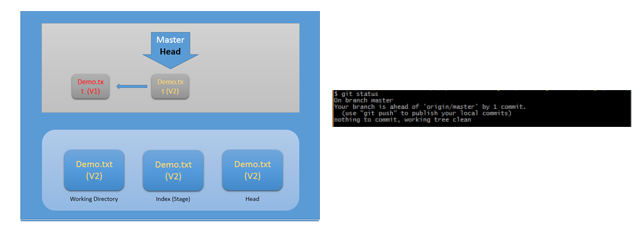
This process will repeat every time you make a commit.
Git reset works just like the above mentioned way but in the reverse manner. There are three type of ‘resets’.
- Soft Reset
- Mixed Reset
- Hard Reset
Soft Reset
git reset <commit> — soft
There is no harm in applying the soft reset. It just change the HEAD pointer. Once you soft reset to a previous commit object, your HEAD takes that particular snapshot. But stage (index) and working directory remains as it was. As the index and the HEAD is different now, there will be a ‘changes to be committed’ message when you check the ‘git status’.
Mixed Reset (Default)
git reset <commit> | git reset <commit> — mixed
Mixed reset will move the HEAD pointer to the particular snapshot and the stage(index) will also be replaced by the previous version. Then Git status will give you the message ‘changes not staged for commit’.
Hard Reset
git reset <commit> — hard
This is a kind of a dangerous command to execute, cause once you done this, you will lose the data(changes you have done in the working directory) which is not yet committed. Since there is no difference between in all three stages, git status will give you the message ‘nothing to commit, working tree is clean’.

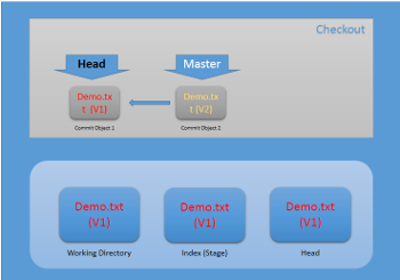
How checkout differ from the reset?
You might wonder what happens when we do checkout. It seems like similar to reset. Actually is it a similar process to reset? No, the main difference between checkout and reset is, in checkout it only moves HEAD pointer while branch pointer remains the same. But in reset as you just saw it will move both the branch and the HEAD pointer.
Revert

Image reference
Even though ‘git reset’ can be used to undo the changes. It might not be good for the repository’s integrity. Because it’ll loose all the later commits which were after the reset commit. In such cases it would be better to use the revert concept. It will inverse the changes from history and create a new commit without those particular changes. By using this we are not losing the version history.
git revert <commit>
Once you enter the above command, if there is no conflict it will undo the changes of the particular commit and ask a commit message for the new commit.
Rebase
Git rebase concept allows you to re-write history commits in a different place. As an example, when you merge a branch there will be a merge commit which makes it difficult to read the history.

Image reference
By using rebase you could rewrite the diverged branch on to other branch which makes your commits in a linear way.
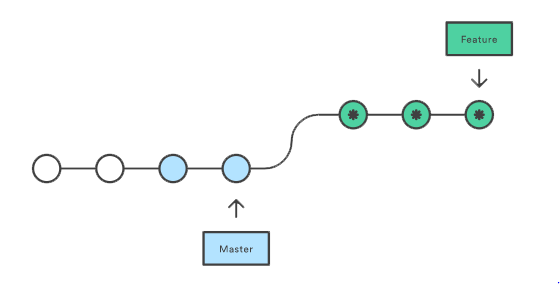
Image reference
Then you can merge it which leads to a fast-forward merge. To do git rebase you must go to the branch that you want to rebase and use the following command.
git rebase <branch>
In here
Interactive Rebase
Interactive rebase allows you to do the rebase manually with full control of the commit history.
git rebase -i <branch>
As soon as you do this you will end up with following confusing options.
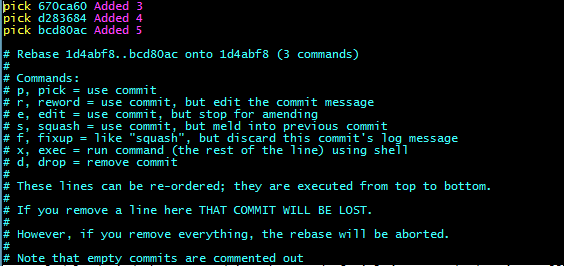
Interactive rebse options
At the top of the file it will show your commits which you are going to rebase. You could change the commit message and order of the commits as well. By default ‘pick’ command is there to do the typical rebase. But you could replace that with any other following commands like reword, squash, fixup, etc.
Squash
Git squash allows you to replace multiple commits into a single commit. Assume you missed a modification that need to be done but you already committed your other changes. In such situation you have no option other than committing that again. Which makes you look less smart. So in such situation you can use squashing. You could simply squash the all the commits you want into one single commit. So other people only see it as a single commit. This is a very helpful feature when it comes to pull requests. Because it will be much easier for pull request reviewers to go through a single commit rather than few.
You could do squashing using following command. Then change the default pick command to s/squash.
git rebase -i
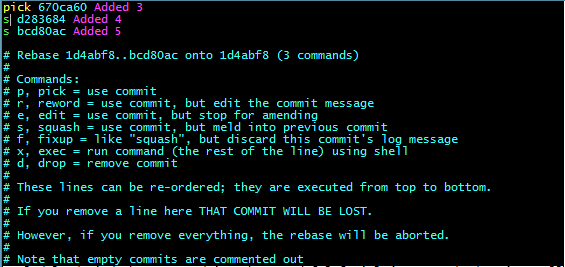
In this case ‘Added 4 ’and ‘Added 5’ commits will be squashed into ‘Added 3’ commit. Once you save the file it will ask you to enter the new commit’s message. Then you are done. You could refer the commit history using ‘git log’.
If you would like to read further in git, use git documentation ‘Pro Git’ , written by cott Chacon and Ben Straub which is published by Apress.